All posts by Jim Merrell

How-to Connect Excel to an External Data Source

For quick and dirty SQL reports, it’s hard to beat dedicated tools such as WinSQL, SQuirrel SQL, or AQT.  However, if you find yourself running the same query on a regular basis and then manually importing the results into Microsoft Excel and customizing the look and feel of the results within Excel (alignment, formatting, titles, etc.), you may find it quicker to connect Excel directly to the external data source (database) and letting Excel run your SQL to retrieve the data directly.

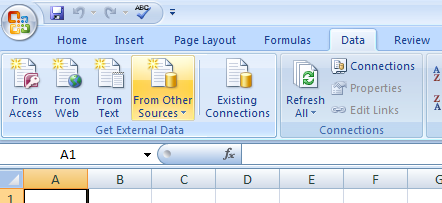
The first thing to do is establish the data source connection. Select the Data tab on the ribbon and click on the From Other Sources command in the Get External Data ribbon group.

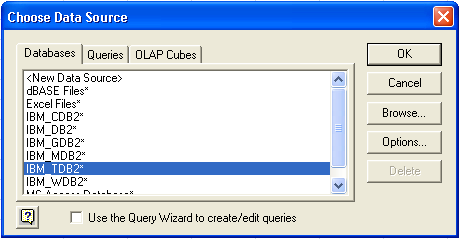
From the pop-up menu, select “From Microsoft Query.”  This will bring up the Choose Data Source panel. (Note:  I had trouble when the ‘Use the Query Wizard to create/edit queries’ item was checked so I keep it unchecked.)

Excel Choose Data Source

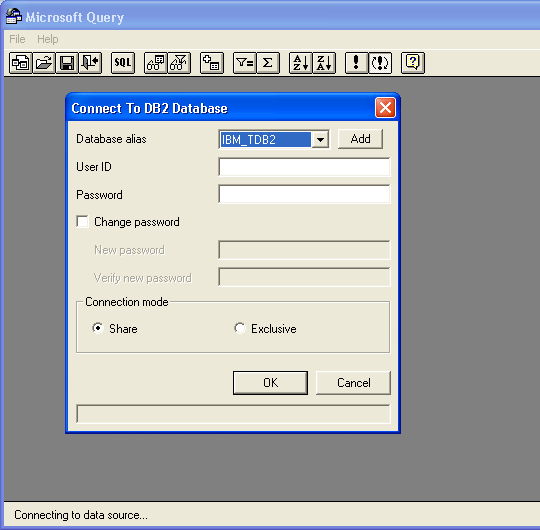
Select the desired connection from the list of available connections.  If you don’t see the connection needed, you will have to manually add/configure the data source first.  Clicking OK will start the Microsoft Query application and display a connect to database dialog.

Microsoft Query Connect to Database

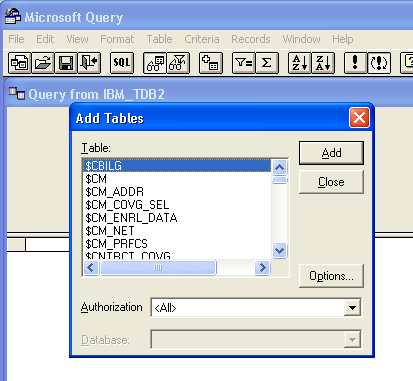
Enter your log-in credentials for the selected database connection and click OK.  It may take a while to connect to the data source the first time.  Once connected, Microsoft Query assumes you want to create your SQL query using the graphical/visual method (similar to MS Access) and prompts you to select the tables for your query.

Microsoft Query Add Tables

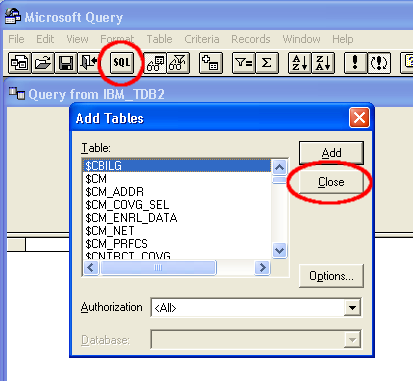
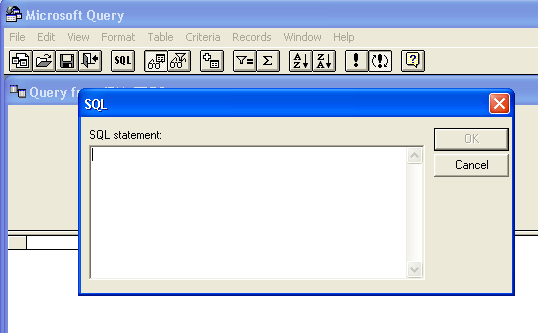
We want to key the SQL directly so close the Add Tables panel and click on the SQL button from the Microsoft Query tool bar to bring up the SQL editor.

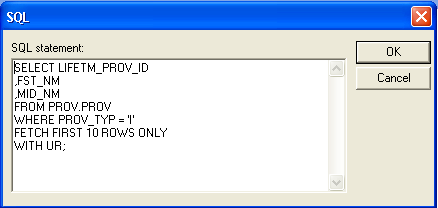
Don’t spend too much time at this point getting your SQL perfect – the SQL can be modified/edited later from within Excel.  Just key something close enough to return some data.  For example:

Microsoft Query SQL editor

Once you have your SQL entered, click OK.  Since we didn’t use the graphical SQL editor, Microsoft gives us the following Microsoft Query warning

Microsoft Query warning

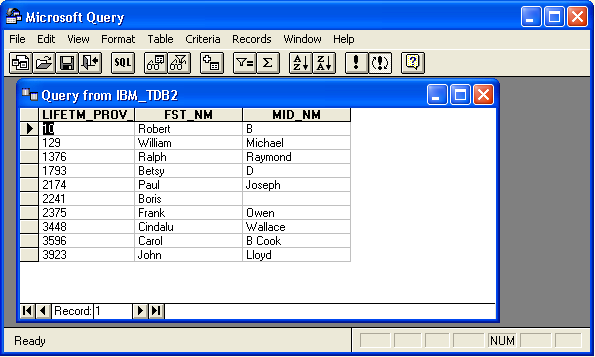
Click OK to continue.  Assuming you have no SQL errors, you should see the results of your SQL in Microsoft Query.

Microsoft Query results

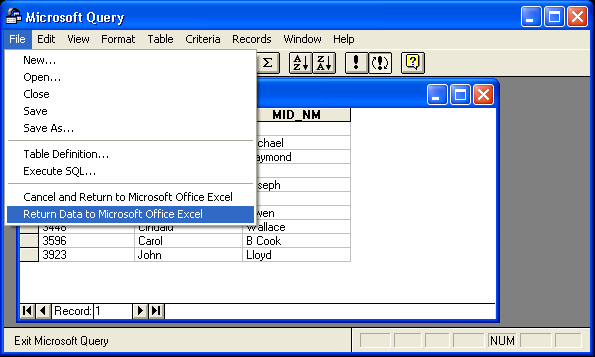
Now we are ready to move the data, SQL, and connection info back to Excel.  From the File menu in Microsoft Query, select Return Data to Microsoft Office Excel.

Microsoft Query return to excel

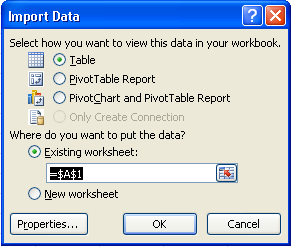
This will close Microsoft Query and take you to an Import Data panel in Excel.  Review the options as needed and click OK.

Excel Import Data

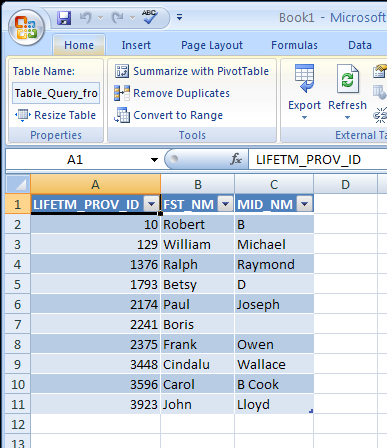
Your results are now displayed in a new table (if that is the import option you selected – the default).

Excel results1

If you save your workbook, the data connection and SQL is saved along with it.  When you want to rerun your SQL, select the Refresh command from the Connections ribbon group, or right-click in the Table and select Refresh from the pop-up menu.  You may be prompted for your user id and password to execute the SQL.

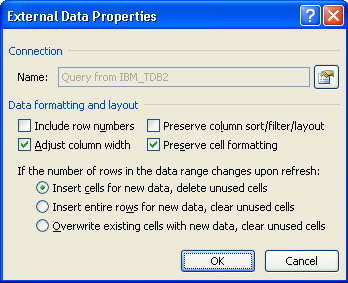
Before you start changing/tweaking your SQL (e.g., adding/removing columns, column aliases, changing the order of the columns, sort, etc.), review the “Data formatting and layout” options on the Properties panel.  To view the properties, click on the Properties command button located in the Connections ribbon group on the Data tab.

Excel Properties command button

Excel External Data Properties

I recommend turning off the Preserve column sort/filter/layout and Preserve cell formatting options until you have finalized the report.  Once you have the SQL and all column formatting the way you want (you can use any of the column formatting options for dates, currency, highlighting, alignment, etc.),  you will want to turn on Preserve column sort/filter/layout and Preserve cell formatting. If you have manually sized your columns, and want to keep them that way when you refresh the data, turn off Adjust column width.  The best way to learn how these options affect the view is by trial and error.

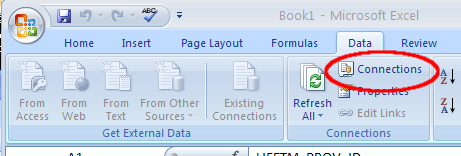
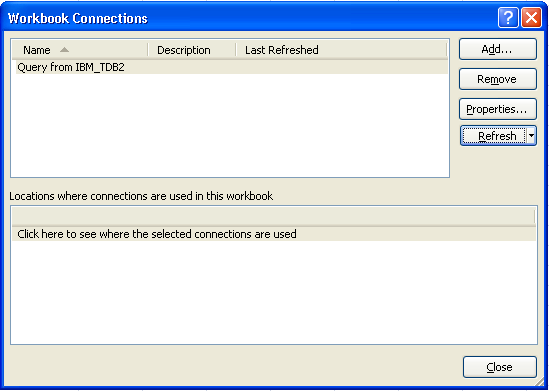
When you are ready to edit/modify the SQL, select the Connections command button in the Connections ribbon group of the Data tab to open the Workbook Connections panel.

Excel Connections ribbon command

Excel Workbook Connections

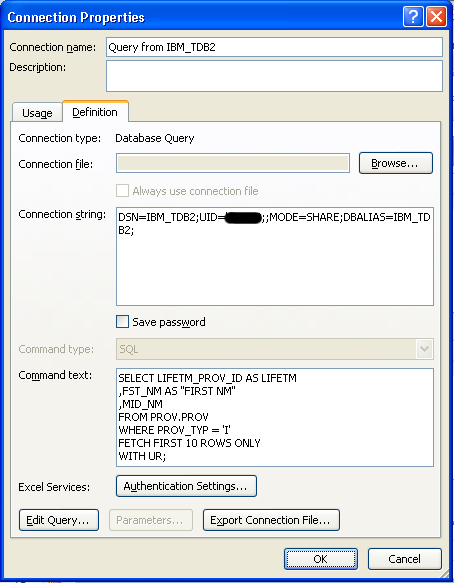
On the Workbook Connections panel, select the connection (a workbook can have more than one connection) then click on Properties.  On the Connection Properties panel, select the Definition tab.  The SQL is listed in the “Command text:” box.

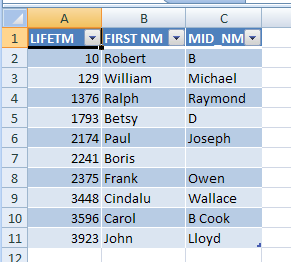
I find it easier to edit the SQL if I maximize Connection Properties panel (click-drag on bottom right corner of panel to expand). In this example I added column aliases to the SQL. If your alias contains a space, you can use the ” (double quotes) around the alias.  I’m not sure what the SQL limitations are; I have been able run some pretty complex queries (multiple table joins, sub-selects, where conditions, etc.) without trouble.

When you are done, click OK.  You may be prompted to enter your user id and password for the database connection.  Follow the refresh instructions above to update the report.

Excel results 2

TIP:  Once you have a workbook/spreadsheet with a data connection, you could just start with that spreadsheet instead of going through Microsoft Query.  That is, pull up the spreadsheet, save it as new workbook and then edit the SQL for the new report.  If your new report requires a different data source connection, however, I recommend starting from the beginning.

Have Fun!!
How-to Compare Two DB2 Tables Using EXCEPT SQL Function

The other day someone was showing me how Advanced Query Tool (AQT) can be used to compare the data in two tables. I started wondering if such a thing could be done using generic SQL or if one had to write a program to compare the tables. I found that such a thing could be done in DB2 using the EXCEPT function (beginning with v9 on z/OS, I think??).

To compare all the columns/rows in TABLE1 to those in TABLE2 you can use the EXCEPT function as follows:

SELECT * FROM TABLE1
EXCEPT
SELECT * FROM TABLE2;

The above SQL will display all rows from TABLE1 that don’t match or exist on TABLE2. The number of columns being compared – and their data type – have to match and you can’t compare certain column types (such as CLOB/BLOB/XML). The nice thing about this, is the EXCEPT function takes care of all the comparison details for you unlike when trying to use the WHERE NOT EXISTS clause.

If at the same time you also want to know what columns/rows from TABLE2 don’t match or exist in TABLE1, reverse the order of the tables in a second EXCEPT select query and join the two results with a UNION clause. Example:

(SELECT * FROM TABLE1
EXCEPT
SELECT * FROM TABLE2)
UNION
(SELECT * FROM TABLE2
EXCEPT
SELECT * FROM TABLE1);

This will list out all the rows in TABLE1 that don’t exist or match on TABLE2 *AND* all the rows in TABLE2 that don’t match or exist in TABLE1. The problem with this SQL is it is difficult to tell from the output which table the row comes from. For example, if the row exists on both tables but there is a column value mismatch, the row will get printed twice – once for each EXCEPT query. If a row doesn’t exist in the other table it will be listed once. Which table does it come from? To make it easier to identify which select/table the row is from, you can add a hard coded identifier to the select clause like the following:

SELECT J1.*, 'TABLE1' AS SRC_TBL
FROM (
      SELECT * FROM TABLE1
      EXCEPT
      SELECT * FROM TABLE2
      ) AS J1
UNION
SELECT J2.*, 'TABLE2' AS SRC_TBL
FROM (
      SELECT * FROM TABLE2
      EXCEPT
      SELECT * FROM TABLE1
      ) AS J2
WITH UR;

There are many other options to fine tune the comparison such as using a WHERE condition to only compare certain rows, or comparing specific columns by including the columns in the select clause – remember the number of columns selected from each table and their data type must match. You can also include a FETCH FIRST n ROWS ONLY clause to avoid ‘run away’ comparisons.

I’m also assuming that the two tables being compared have the same primary/unique key defined. It’s not required, but if the table does not have a primary/unique key, it becomes difficult to sort the results in a way that makes the comparison easy to decipher.

Also take a look at the INTERSECT function which can be used to identify all the rows that DO match.

You can read more about these functions on IBM’s website.

Have a great day!

Outlook Macro Stops Working (or Doesn’t Work to Begin With)?

A day or two after setting up my Outlook GTD macros (as explained here), they stopped working. When I clicked on the macro in the toolbar, used the shortcut keys, or clicked the macro icon in the Quick Access toolbar in Outlook, nothing happened. That was strange because everything worked the day before. I opened up the VB Editor from within Outlook (Alt+F11) and tried to run the macro from within the VB editor. That is when I saw what the problem was:

Something must have changed with the Microsoft security settings on my machine. Once I read the error message, I remembered when I originally created the macros several years ago (on my previous computer) I had to create a digital signature and sign the macros in order to get past the Trust Center security settings. Luckily doing so isn’t that complicated.

Step 1 – Create Personal Digital Certificate

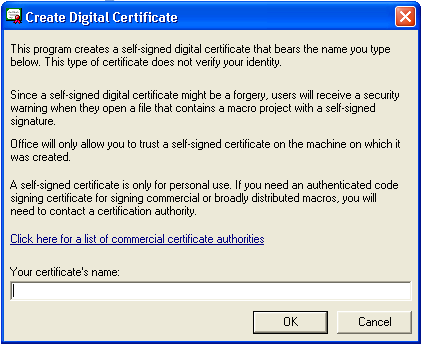
The first thing you need to do is create a personal digital certificate. To do this, you need to run the SELFCERT.EXE program supplied by Microsoft Office. On my machine, the executable was located in the C:\Program Files\Microsoft Office\Office12 directory. Assuming you have access/authority to run the executable, locate the file and double-click it to start the program. This should bring up the Create Digital Certificate window.

Type in your name in the Create Digital Certificate dialog and click OK. The personal certificate has now been created on your machine.

Step 2 – Sign your macros using your digital certificate

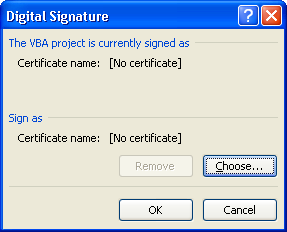
Next you need to sign your macros using the personal certificate you just created. Open the macro file in the VB Editor (Alt+F11 in Outlook) and select the Digital Signatures menu item from the Tools menu. Click the Choose button to select a certificate.

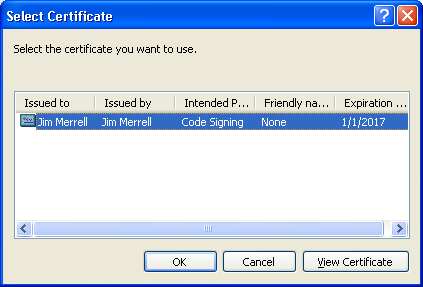
You should see the certificate you created in the previous step.

Select the digital signature to use and click OK.

Make sure to save the VB project and close the VB editor.

Step 3 – Restart Microsoft Outlook

I’m not sure if this is required, but it seems like I had to restart Outlook for the macro signing to take effect.

Step 4 – Update the Trust Center

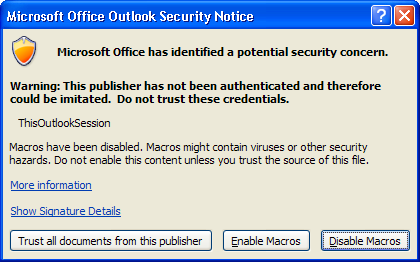
When you restart Outlook, and run the macro, it will either work or, depending on your settings, you may see the Trust Center security warning notice.

Click on the ‘Show Signature Details’ to verify that the macro you are trying to run is signed with your certificate. Assuming this is the case, click on the “Trust all documents from this publisher” button. The macro should now run.

Trouble shooting

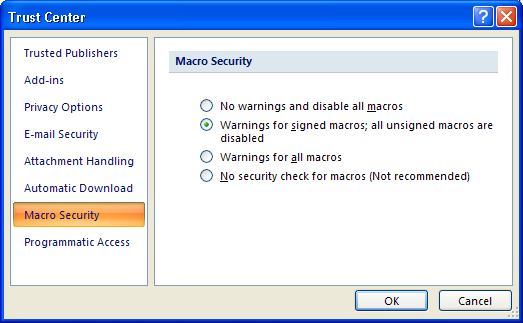
If your macros still don’t work, or if you don’t see the Outlook Security Notice window when trying to run the macro, it could be that your Trust Center settings are blocking all macros without warnings. To check this setting, click on the Trust Center menu item from the Outlook Tools menu. Select Macro Security from the left panel and verify your Macro Security.

Have a great day!

Adding Macros to Outlook’s Quick Access Toolbar

In a previous post I described how to use Outlook macros to move selected emails to target folders.  This works great if you use the “Reader Pane” that’s part of the main Outlook window.  But if you are like me, I like to view my emails in a separate window (I have the Reader Pane turned off).  The problem with that is when I’m viewing an email, the Outlook tool bar is often hidden and the hot keys don’t work.  Luckily there is a simple solution: add your macros to the viewer’s quick access toolbar.

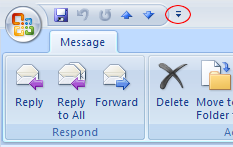
To do so, open up the email viewer and click on the ‘Customize’ button in the Quick Access toolbar and select More Commands from the pop-up window.

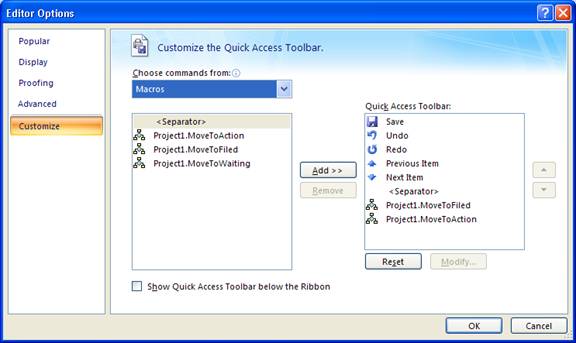
This will bring up the Editor Options panel.

Select Macros from the “Choose commands from:” drop down to display the macros you created.  Select a macro and click on the Add button to add the macro to the Quick Access Toolbar.  (Notice I added a separator as well.) If you want to choose a different icon or display name for the macro, select the macro just added to the quick access toolbar section of the panel and click on Modify to make the changes.  Click “OK” when complete.

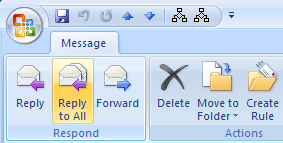
You should now see the icons for the macros in the quick access toolbar.  To run the macro, simply click on the icon.  If you hover your mouse over the icon in the quick access toolbar, the name of the macro appears.

Have a great day!

Using Outlook Macros to Move Email Items to Another Outlook Folder

When my work PC came off lease I took the necessary steps to back up my documents, IE favorites, etc. so I could add them on the new machine. After getting the new machine (and turning in the old one), it didn’t take me long to realize I had forgotten to copy something I use A LOT – Outlook macros. Unfortunately, I didn’t make notes when I set them up several years ago, so I had to start from scratch. There were plenty of examples on the web, but each assumed the target folder was located under the Inbox folder. My target folders were located on the same level as the Inbox. I finally got it working and decided to document the process for future reference.

The premise behind these macros is based on David Allen’s “Getting Things Done” methodology (GTD). I was also influenced by the “Inbox Zero” series on Merlin Mann’s “43 Folders” website, and a very good 2008 MacWorld article series entitled “Empty Your Inbox.”

While my email inbox never really gets to ‘zero,’ I am able to keep it pretty lean – depending on how diligent I am in following the GTD system.

Step 1 – Create your target folders

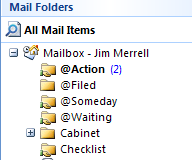
To create folders, right-click where you want to the folders to be created and select “New Folder” from the pop-up menu. I created my folders under the main Mailbox home folder. If you want to have your folders sort to the top of the list, start the folder name with a symbol such as ‘@’.

I use 4 main folders:

  1. @Action – Items I need to take action on to complete
  2. @Filed – Items I want to keep for future reference (i.e., I don’t want to delete it)
  3. @Someday – Items I may want to take action on at some point in the future; no time constraint
  4. @Waiting – Items I’m waiting on a response from someone else before I can resolve

Step 2 – Create your Outlook Macros

In Outlook (2007), click on the Tools | Macro menu item and select Visual Basic Editor (or use the Alt+F11 shortcut). Copy/paste the following VB Macro into the script editor. Make sure to change the name of the folders to match your email setting.

'Outlook VB Macro to move selected mail item(s) to a target folder
Sub MoveToFiled()
On Error Resume Next

Dim ns As Outlook.NameSpace
Dim moveToFolder As Outlook.MAPIFolder
Dim objItem As Outlook.MailItem

Set ns = Application.GetNamespace("MAPI")

'Define path to the target folder
Set moveToFolder = ns.Folders("Mailbox - Jim Merrell").Folders("@Filed")

If Application.ActiveExplorer.Selection.Count = 0 Then
   MsgBox ("No item selected")
   Exit Sub
End If

If moveToFolder Is Nothing Then
   MsgBox "Target folder not found!", vbOKOnly + vbExclamation, "Move Macro Error"
End If

For Each objItem In Application.ActiveExplorer.Selection
   If moveToFolder.DefaultItemType = olMailItem Then
      If objItem.Class = olMail Then
         objItem.move moveToFolder
      End If
  End If
Next

Set objItem = Nothing
Set moveToFolder = Nothing
Set ns = Nothing

End Sub

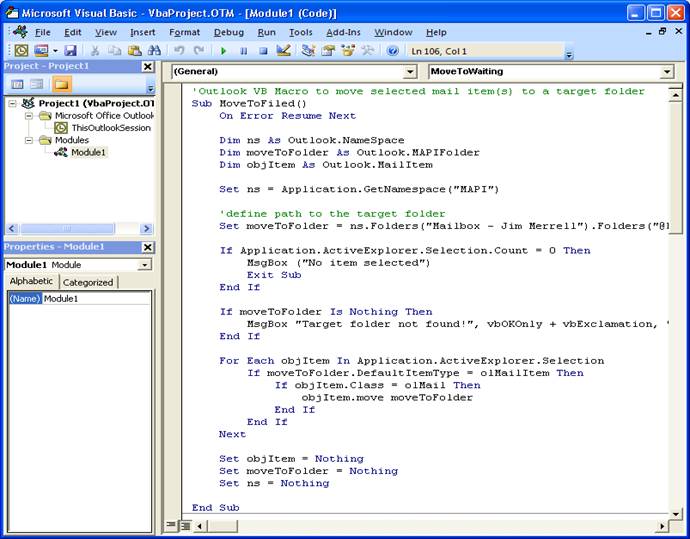
Here is how it looks in the VB Editor:

Step 3 – Test macros

To test the macros, click Run on the menu, the green ‘play’ button, or press F5 (Run Macro) in the VB Editor window. If no errors are displayed, verify that the selected email(s) has moved to the desired target folder.

Update 5/25/2011: If nothing seems to happen when you run the macro (i.e., no error message and the email isn’t moving to the target folder), the security settings on the machine may be blocking the macros from running. See the following post for more information.

Step 4 – Repeat

Repeat steps 2 and 3 above to create a separate macro for each of your target folders. For simplicity, I added all the macros to the default module (module1); copy/paste each function/macro after the “End Sub” line of the previous macro. After you copy/paste the code remember to:

  • Update the function/method name of the script to describe what the macro does (i.e., Sub MoveToFiled(), Sub MovedToAction(), etc.)
  • Update the path to your target folder
  • Save the macro/script file

Update 5/25/2011: A ‘cleaner’ way to avoid all the duplication of code – the only difference is the name of the target folder – is to have a main function that does all the work and then call that function passing in the name of the target folder. Example:

'Outlook VB Macro to move selected mail item(s) to a target folder
Sub MoveToFolder(targetFolder)
On Error Resume Next

Dim ns As Outlook.NameSpace
Dim MoveToFolder As Outlook.MAPIFolder
Dim objItem As Outlook.MailItem

Set ns = Application.GetNamespace("MAPI")

'define path to the target folder; the following assumes the target folder
'is a sub-folder of the main Mailbox folder
Set MoveToFolder = ns.Folders("Mailbox - Jim Merrell").Folders(targetFolder)

If Application.ActiveExplorer.Selection.Count = 0 Then
    MsgBox ("No item selected")
    Exit Sub
End If

If MoveToFolder Is Nothing Then
    MsgBox "Target folder not found!", vbOKOnly + vbExclamation, "Move Macro Error"
End If

For Each objItem In Application.ActiveExplorer.Selection
    If MoveToFolder.DefaultItemType = olMailItem Then
        If objItem.Class = olMail Then
            objItem.move MoveToFolder
        End If
    End If
Next

Set objItem = Nothing
Set MoveToFolder = Nothing
Set ns = Nothing

End Sub

Sub MoveToFiled()
    MoveToFolder ("@Filed")
End Sub

Sub MoveToAction()
    MoveToFolder ("@Action")
End Sub

Sub MoveToWaiting()
    MoveToFolder ("@Waiting")
End Sub

Step 5 – Add button to Outlook menu bar

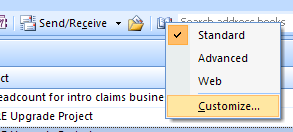
To run the macro using the click of the mouse, or using hot keys, I added the macros to the menu bar. Right-click on a toolbar and select ‘Customize…’ from the pop-up menu

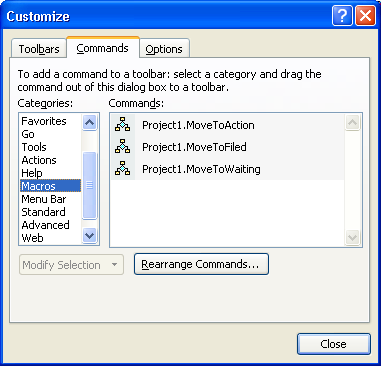
On the Commands tab of the Customize window, scroll down the Categories list and select Macros. You should see the macros (created in step 2 above) in the Commands section.

To add a macro to the toolbar, left-click and drag the macro command(s) to the toolbar and release in the desired location.

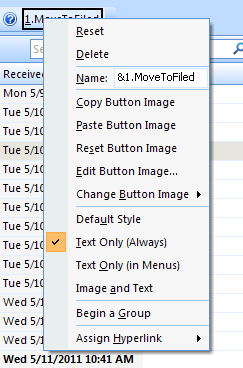
With the Customize window still displayed, right-click on the macro item in the toolbar to display additional customization options. To enable the macro to run using a keyboard shortcut, use the ‘&’ character before the desired character (used in conjunction with the Alt key) in the Name. For example, to run the “MoveToFiled” macro with the Alt+1 shortcut, change the name to “&1.MoveToFiled.” (Note the ‘.’ is just to provide a visual separation.)  Also, to save space on the toolbar, select “Text Only (Always).”

The finished result looks like this:

Now you can run your macro by clicking on the toolbar item, or using the Alt+1, Alt+2, or Alt+3 shortcut.

Next: Adding Macros to Outlook’s Quick Access Toolbar

Have a great day!