When my work PC came off lease I took the necessary steps to back up my documents, IE favorites, etc. so I could add them on the new machine. After getting the new machine (and turning in the old one), it didn’t take me long to realize I had forgotten to copy something I use A LOT – Outlook macros. Unfortunately, I didn’t make notes when I set them up several years ago, so I had to start from scratch. There were plenty of examples on the web, but each assumed the target folder was located under the Inbox folder. My target folders were located on the same level as the Inbox. I finally got it working and decided to document the process for future reference.
The premise behind these macros is based on David Allen’s “Getting Things Done” methodology (GTD). I was also influenced by the “Inbox Zero” series on Merlin Mann’s “43 Folders” website, and a very good 2008 MacWorld article series entitled “Empty Your Inbox.”
While my email inbox never really gets to ‘zero,’ I am able to keep it pretty lean – depending on how diligent I am in following the GTD system.
Step 1 – Create your target folders
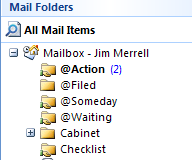
To create folders, right-click where you want to the folders to be created and select “New Folder” from the pop-up menu. I created my folders under the main Mailbox home folder. If you want to have your folders sort to the top of the list, start the folder name with a symbol such as ‘@’.
I use 4 main folders:
- @Action – Items I need to take action on to complete
- @Filed – Items I want to keep for future reference (i.e., I don’t want to delete it)
- @Someday – Items I may want to take action on at some point in the future; no time constraint
- @Waiting – Items I’m waiting on a response from someone else before I can resolve
Step 2 – Create your Outlook Macros
In Outlook (2007), click on the Tools | Macro menu item and select Visual Basic Editor (or use the Alt+F11 shortcut). Copy/paste the following VB Macro into the script editor. Make sure to change the name of the folders to match your email setting.
'Outlook VB Macro to move selected mail item(s) to a target folder
Sub MoveToFiled()
On Error Resume Next

Dim ns As Outlook.NameSpace
Dim moveToFolder As Outlook.MAPIFolder
Dim objItem As Outlook.MailItem

Set ns = Application.GetNamespace("MAPI")

'Define path to the target folder
Set moveToFolder = ns.Folders("Mailbox - Jim Merrell").Folders("@Filed")

If Application.ActiveExplorer.Selection.Count = 0 Then
   MsgBox ("No item selected")
   Exit Sub
End If

If moveToFolder Is Nothing Then
   MsgBox "Target folder not found!", vbOKOnly + vbExclamation, "Move Macro Error"
End If

For Each objItem In Application.ActiveExplorer.Selection
   If moveToFolder.DefaultItemType = olMailItem Then
      If objItem.Class = olMail Then
         objItem.move moveToFolder
      End If
  End If
Next

Set objItem = Nothing
Set moveToFolder = Nothing
Set ns = Nothing

End Sub
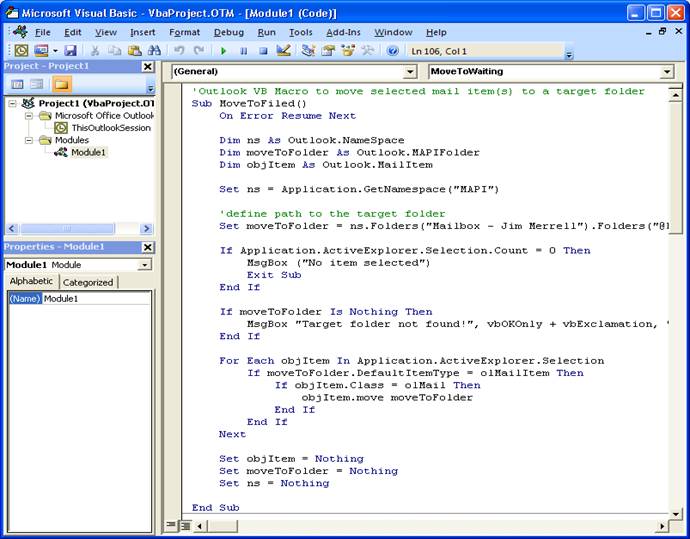
Here is how it looks in the VB Editor:
Step 3 – Test macros
To test the macros, click Run on the menu, the green ‘play’ button, or press F5 (Run Macro) in the VB Editor window. If no errors are displayed, verify that the selected email(s) has moved to the desired target folder.
Update 5/25/2011: If nothing seems to happen when you run the macro (i.e., no error message and the email isn’t moving to the target folder), the security settings on the machine may be blocking the macros from running. See the following post for more information.
Step 4 – Repeat
Repeat steps 2 and 3 above to create a separate macro for each of your target folders. For simplicity, I added all the macros to the default module (module1); copy/paste each function/macro after the “End Sub” line of the previous macro. After you copy/paste the code remember to:
- Update the function/method name of the script to describe what the macro does (i.e., Sub MoveToFiled(), Sub MovedToAction(), etc.)
- Update the path to your target folder
- Save the macro/script file
Update 5/25/2011: A ‘cleaner’ way to avoid all the duplication of code – the only difference is the name of the target folder – is to have a main function that does all the work and then call that function passing in the name of the target folder. Example:
'Outlook VB Macro to move selected mail item(s) to a target folder
Sub MoveToFolder(targetFolder)
On Error Resume Next

Dim ns As Outlook.NameSpace
Dim MoveToFolder As Outlook.MAPIFolder
Dim objItem As Outlook.MailItem

Set ns = Application.GetNamespace("MAPI")

'define path to the target folder; the following assumes the target folder
'is a sub-folder of the main Mailbox folder
Set MoveToFolder = ns.Folders("Mailbox - Jim Merrell").Folders(targetFolder)

If Application.ActiveExplorer.Selection.Count = 0 Then
    MsgBox ("No item selected")
    Exit Sub
End If

If MoveToFolder Is Nothing Then
    MsgBox "Target folder not found!", vbOKOnly + vbExclamation, "Move Macro Error"
End If

For Each objItem In Application.ActiveExplorer.Selection
    If MoveToFolder.DefaultItemType = olMailItem Then
        If objItem.Class = olMail Then
            objItem.move MoveToFolder
        End If
    End If
Next

Set objItem = Nothing
Set MoveToFolder = Nothing
Set ns = Nothing

End Sub

Sub MoveToFiled()
    MoveToFolder ("@Filed")
End Sub

Sub MoveToAction()
    MoveToFolder ("@Action")
End Sub

Sub MoveToWaiting()
    MoveToFolder ("@Waiting")
End Sub
Step 5 – Add button to Outlook menu bar
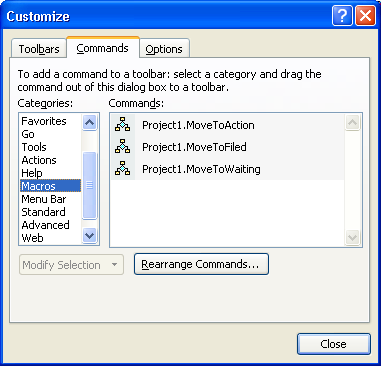
To run the macro using the click of the mouse, or using hot keys, I added the macros to the menu bar. Right-click on a toolbar and select ‘Customize…’ from the pop-up menu
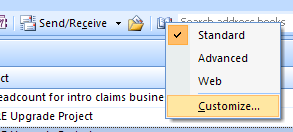
On the Commands tab of the Customize window, scroll down the Categories list and select Macros. You should see the macros (created in step 2 above) in the Commands section.
To add a macro to the toolbar, left-click and drag the macro command(s) to the toolbar and release in the desired location.
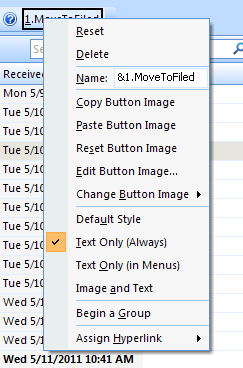
With the Customize window still displayed, right-click on the macro item in the toolbar to display additional customization options. To enable the macro to run using a keyboard shortcut, use the ‘&’ character before the desired character (used in conjunction with the Alt key) in the Name. For example, to run the “MoveToFiled” macro with the Alt+1 shortcut, change the name to “&1.MoveToFiled.” (Note the ‘.’ is just to provide a visual separation.) Also, to save space on the toolbar, select “Text Only (Always).”
The finished result looks like this:
Now you can run your macro by clicking on the toolbar item, or using the Alt+1, Alt+2, or Alt+3 shortcut.
Next: Adding Macros to Outlook’s Quick Access Toolbar
Have a great day!
